Friday, February 22, 2013

Dry Brushng Your Projects- VERY Simple!

I've been continuing to pour over my dream place for creating.  This little basket has made itself useful in keeping an assortment of trinkets organized. It's sturdy and nice looking. But I wanted to give it a new look and bring it up to date with my space.

I've been learning a lot about different art/crafts techniques. Including painting. The dry-brush look
is very attractive to me and so I wanted to give it a try.


                            dry brush technique:


using a dry brush almost free of paint to stroke in highlights and shading..

 
                            The basket in the natural. I really liked the wooden handles.


 After being dry-brushed.
 
 This is really very simple and you can see the nice shabby chic
appearance it gives. Just barely dip your brush in the desired color and apply lightly. You can go back over it until you get the look you want. And if a spot is accidentally covered too heavily, it's pretty easy to lightly sand and remove some of the paint.

There are SO many things that you can apply this technique to. Furniture, fabric, wicker...Just be creative and bold. You can start with something thrifted to practice on. But it really is very easy. This was the first item I ever painted and I thought it turned out nicely. And the process is very fast.

The brush I used was an old chip brush. They are inexpensive and work well for dragging. They lack bristle density which causes them to kind of  'finger'. This means that they clump together a bit which causes nice lines and a varied look. They can lose bristles at times though so you may want to double check for those so they don't get dried onto your project.

Well, that about covers it. I hope you have fun trying this fun and inexpensive
way to dress up your project.

Blessings to you!

Wednesday, February 13, 2013

Thrifted Treasures

Well, yesterday was my birthday. Because of a Dr. appointment in a neighboring city, I was able to do one of my favorite things. Go thrifting. I especially enjoy going to places like The
Women's Hope Shop. This supports the unborn children and families who are in crisis. And animal shelter stores. I then know that my dollar goes twice as far. It not only goes to benefit those who need
a little extra loving support but I am blessed with a bargain or two!


Here is the spread of treasures that I was able to find. So much to look at and I just loved the mix of colors for the photo. I must say I felt so blessed! I don't know how how many times I have thought," Oh, I would like to have this or that." and in just a little while, I am able to find it.
___________________________________________________
 
Three handsome lamps. And the smallest one uses a two-way bulb. So sweet.
 
 Ruffly, Angelic-white pillows 

 
Details. So pretty.
 
Scrolls.
Bows.
Aren't the cracks charming.
__________________________________________________
 
The base is plaster. I'm not overly fond of glossy-
white but I can fix that. I am just learning about paint and techniques so I
don't have an exact plan. But there is a vision in my mind to soften the color,
and darken some edges.


 The taupe cloth that you see is actually......
a woolen shawl made in India!
 
The color caught my eye. It's one of my favorites.
It layers so lovely and softly with creams and whites.
Because it's such a perfect weight, it can also be worn as a scarf.


 Beaded jewelry .... vintage clothing
 
lovely ~


My husband and I share in this journey which makes it a double-blessing.
 
I saw this.
Picked it up and said,"Oh, I want this."
He asked what it was. I didn't know. (I'd like to find out.)
But isn't it unique?
Yes.
And I thought it "Old World" looking.
 
Strong. Bold. Enduring.
 
I'm looking forward to finding more treasures. Useful to our home and also
to sell. There's so much inspiration out there.
 
I have made a beautiful new blogger friend and hers is one of my favorite blogs.
 
It's called  A Gathering Place.
 
Her blog is gorgeous and her work is quite lovely.
It's so wonderful when people share their gifts and talents.
 
Be blessed.


Saturday, February 9, 2013

Vintage Tag Valentine with Waxed Paper Envelope

I enjoy giving cards and gifts to people. And sharing a small token of friendship or kinship
is such a warm way to communicate to someone how special they are.
 
While thinking of my daughters, sisters and friends,
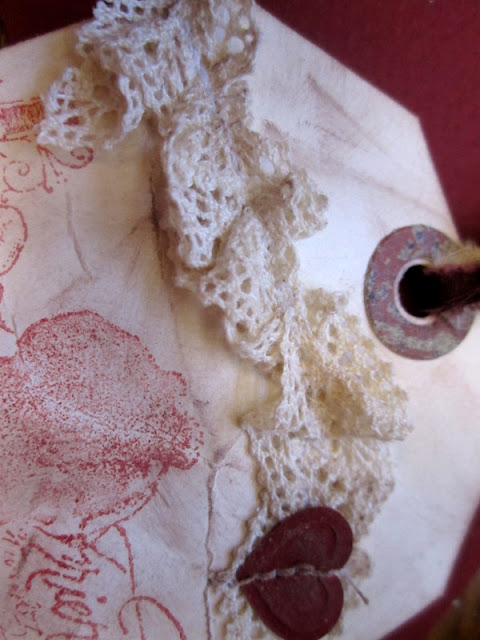
I was inspired to make these little Valentine tags.
 
To make the tags, I cut some vanilla card stock 4.75 x 2.75. 
With a ruler, at the top corners, I measured one inch across diagonally
 to cut the corner off
to give it the cropped look. A paper punch works fine for
the hole at the top.
 
One of the funnest parts of the project is choosing the stamp.
Followed by the color of ink and fabric that
matches the design and effect I am looking for.
 
 
 I scrunch the paper to give it that aged look. I then took a light brown inkpad
and rubbed it over the crinkles. It picks up the color very nicely.
 
I cut the donuts to cover the holes with the Tim Holtz Tiny Tags and Tabs die.
The small hearts were made with a Stampin' Up punch.
 
Lacey trim really added the feminine feel that I wanted. When cutting it, measure
 one and a half times the width of the tag.
I just held it into place while sewing  it on. I really enjoy working with
mixed media!
 
Ideas flow and the heart just creates as I go. The feeling of
 unbound creativity is like....
 
A river that has no end.
Flowing, flowing.


The strips of  frayed rag that thread through the eye of the tag were just torn from scraps
and tied at the end. Finding a bead with a hole big enough to pull the pieces through was a
bit of a challege. But I happened to have the perfect hues to compliment the fabrics.
 
I learned something about tearing strips. You can't tear against the selvage! I
never realized how strong it could be.
 
 
And in the next photo, you can see the little punched heart that
I stitched to the lace. To me, the look of stitched paper has such a neat
 look to it.


 After the little cards were finished, I really wanted to put something
together to slip them in. A special type of packaging that would
add a little elegance. I decided to try waxed paper. I wasn't sure if it was going
hold up under the sewing machine. It was a bit fragile but taking a little extra care,
I was able to do it.
 
Here's how I made the envelope:
 
1) With the brand name paper, I tore off a piece wide enough to cover
two of the tags with about an inch or two to spare
because you will need to trim the excess waxed paper off
after you sew your side seams. (This will depend on your tag size.)
Then I folded it with the finished sides together and this
made the perfect length envelope.
 
2) I wanted a pretty, fabric ruffle on it and so I found a scrap that
matched the colors of ink and fabric strips that I liked and used.
The strips can be the width and shape of the ruffle size and look that you want.
  I had planned to give it a tapered look and so I cut my pieces at
an angle. I didn't measure the length. But you want them at least
one and a half times the width of the envelope if you want
to gather and make a ruffle. Mine weren't exactly the same but this
is part of the charm of handmade items.
 
They are one of a kind!


3) Next, I gathered the fabric and then placed it where I wanted it on the
waxed paper. I didn't pin the ruffle to the paper. I was afraid that it might tear.
Setting the stitch length at 3.5,
 I gently held it in place, lifting the presser foot to help it over the thicker spots.
  Because the paper is so thin, the feed dog doesn't grab it
as securely as it could. So, it helps to gently ride your fingers on each side of the
presser foot to push just a bit. 


 4) The side seams are next. Fold the paper in half bringing the smooth edges
together until they meet evenly. Crease the bottom and then stitch just to the outside
of the ruffle. Trim off the excess to the desired seam width. To finish it off,
I added some lace that matched the ruffle on the tag and topped that with a pretty
little vintage button.


Over all there were some colors that were a little too plain or stark looking for the design.
To fix that, I found some complementary colors and just did some softening and
blending by inking my fingertip and applying where needed.
 
 
And I was very pleased with the final appearance. I thought that it
 
 turned out very sweet and so I made three more.
 
***********************
 
I would enjoy hearing your opinions on it!
 
Thank you for visiting and a very
 
Happy Valentine's Day
 
to you all.
 
Blessings,
Tamara

Tuesday, February 5, 2013

A Geranium in Winter

Vibrant red. Delicate petals. Bold scent.
 
These are what have made the Geranium a favorite of mine.
 
To have this blooming in my room in the dead of winter
is a particular joy for the outside world is cold and hard. Gray and brown.
 
It's right that it's blooming right now. The color red in flowers
symbolizes:
Love
and the giving or receiving can be thought of as an
expression of love or desire.
 
 
During Post War times they were often found in homes and on
front porches. Seeing them brought hope to many as they
represented a positive change and a bright outlook.
 
********************************************
 
And not only is the plant beautiful, this native of Africa is very useful as well.
The oil of the plant has been used as a relaxant and to ease respiratory
complications.
 
Powdered leaves have been used to treat burns and wounds. In the past,
the tubers boiled in milk
have helped with digestive disorders, while teas taken have
 relieved people from nausea and dysentery.  


I look and I am thankful. I touch the leaves green and soft. I
 smell it's presence when I stand close.
Clean and refreshing. 
It is it's own little celebration and
it touches me with it's
 happiness.